DEFINITIVE The Ascent BEST BUILD Guide
This The Ascent Best Build guide will give players insight on the best The Ascent build so they can make their character as strong as it can be.
If you’re playing The Ascent, you know that choosing where to allocate your character’s skill points is a big part of the game and the reward for leveling up. You’ll also notice there are tons of The Ascent best build guides floating around on the internet, touting all sorts of different builds.
Having played The Ascent all the way through and then some, the fact of the matter is The Ascent is not a game with a wide variety of equally effective and balanced ways to build your character. There is a way you should build your character, and a number of worse ways to build your character.
There are a couple of reasons for this. First, you can max out every stat if you want. There is no level cap. Most players end the game at around level 30 and at that level, including the stray skill points you can pick up around the map, you should be able to max out 4-5 stats with a few points left over.
As a result, what really matters is the order in which you max out stats.
This game has been out for about a year as of writing this so must of the dust has settled around what makes for a The Ascent best build.
Without further ado, let’s get into The Ascent Best Build guide.
The Ascent Skills Overview – The Ascent Best Build
There are 8 skills in The Ascent, and as I mentioned in the intro you’ll be able to max out 4-5 of them. Luckily for you 3-4 of them are pretty much useless, which is the main reason there’s no real diversity when it comes to The Ascent best build. Let’s talk about each stat briefly:
Tactical Sense
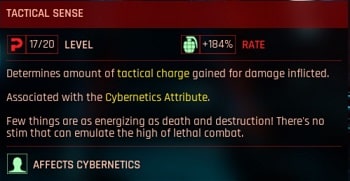
Tactical Sense affects how quickly your Tactical Charge fills up. Tactical Charge give you the ability to use tactical gear, which are grenades, basically, and a handful of other tech gadgets.
It also increases your Cybernetics attribute, which is what most of the good Augmentations scale off of, most notably Joyrun Dragon and Spiderbots.
This stat is decent. It’s not a priority.
Critical Hit Rate
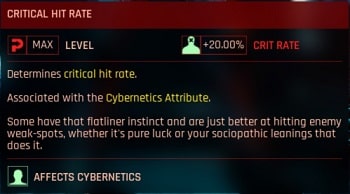
Critical Hit Rate increases the likelihood that your gunshots will deal double damage. It gives 1 point per level, so at level 20 it gives +20% crit. This is a pretty significant bonus to your damage, since although you’ll periodically use Tactical weapons and Augmentations, gun damage will represent probably 99.99% of all damage you deal in The Ascent.
it also increases your Cybernetics attribute, so there’s no reason to prioritize Tactical Sense over this. Critical Hit Rate is just hands down a better stat.
Critical Hit Rate is a top priority for The Ascent best build.
Weapon Handling
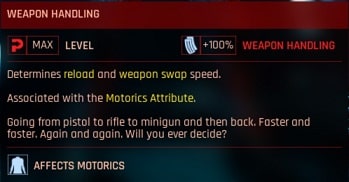
Weapon Handling improves your reload speed. At max level it doubles your reload speed. This is a pretty decent quality of life improvement, as the best gun for most of the game is an assault rifle with a 20 round clip, and the best weapon for the final dungeon, while having a huge clip, has a very long reload speed.
It increases Motorics, which is mainly useful for one good Augmentation (Neutron Beam), but I question how useful it really is, sense it only increases the duration. Neutron Beam roots you in place and you’re much more likely to manually end it than for it to end naturally, given how much you tend to kite around in The Ascent.
Still, increased reload speed is pretty good. Not the best thing, but still a nice bonus. You have points for it in The Ascent best build so might as well max it out.
Aiming
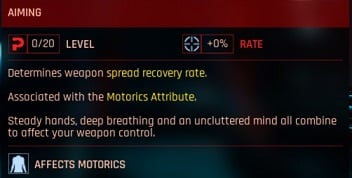
Next up is aiming, which doesn’t mean what you probably think it means. In your head you probably think aiming will reduce bullet spread on all guns and give your guns a tighter cone. That’s not how it works.
Aiming reduces “spread recovery rate.” As you continually fire your gun, the accuracy decreases, and when you wait a few seconds, it recovers to its original spread. Aiming reduces the amount of time you have to wait. It does not increase the overall accuracy of the gun.
Here’s the thing about spread recovery rate, though. It’s already quite short, and every reload is more than enough time for it to recover. You’ll be using The Overwhelmer for almost the entire game, most likely, which reloads often enough you’ll barely even notice the accuracy penalty from continual firing.
It also increases Motorics, which, as discussed, is not a particularly useful attribute. It affects some direct damage spells, most notably Neutron Beam, but it’s not a major priority.
Aiming, overall, is almost completely useless as a stat. Useless for The Ascent best build. Skip it.
Balance
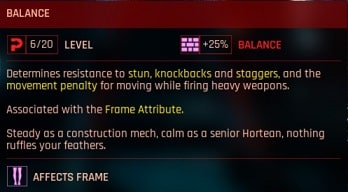
Balance gives you resistance to stuns, knockbacks and staggers, all things that, as far as I can tell, no enemies in The Ascent have the ability to inflict. Maybe some of the highly telegraphed swings from the big melee enemies cause them, but if you get hit by those you probably have bigger problems (i.e. you’re dead).
It also reduces the movement penalty with heavy weapons like Miniguns. You need exactly 6 points in this to reduce the movement penalty for using the best weapon in the game, The Dealbreaker. However, you get The Dealbreaker literally in the final dungeon right before the final boss.
You need 6 points in this for The Ascent best build, so save 6 points for this in the endgame when you get sent to Silo 86. Don’t bother with it before then.
It also increases the Frame attribute, which improves a few interesting Augmentations, but nothing groundbreaking.
Evasion
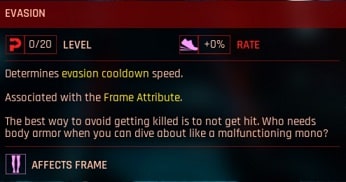
Evasion reduces the cooldown of your roll, and if you pump enough points into it, you get to roll more times in succession.
More rolls can be somewhat useful. By default you can roll twice, at 9 points you get 3 rolls, and at 16 you get 4.
Here’s the thing, though: two rolls is more than enough for most of the game. The only time you may feel a need for more rolls is probably against the Spiderbot boss you fight towards the middle of the game. Otherwise, most things you need to roll away from are highly telegraphed.
More than anything else, extra rolls are good for getting around the map.
Evasion also increases Frame, which is one of the less desirable Attributes.
Overall it’s not necessary for The Ascent best build.
Vital Signs
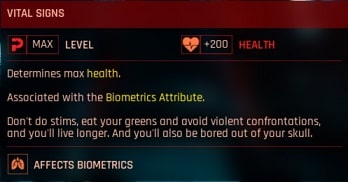
Vital Signs increases your Max HP. At max level it increases Max HP by 200. It is 100% necessary and completely required. You should get this stat to max ASAP, or else things will start one-shotting you as early as the first or second mission. As far as stats for The Ascent best build go, Vital Signs is priority #1.
Vital Signs also increases Biometrics, which improves some of the best Augmentations (I/O Converter, Overclock, Tentakill).
Body Battery
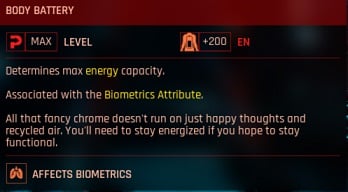
Body Battery increases your Max MP. Like Vital Signs, at max level it increases MP by 200. This is not 100% necessary, it’s more of a bonus, and Augmentations, for the most part, are more limited by cooldown than by MP, but it’s still useful.
I’d recommend maxing this out or at least putting some points here when you start feeling like you don’t have enough MP to use your Augmentations as much as you want, but I’d say it’s a low priority overall.
The Order to Level Skills – The Ascent Best Build Guide
As I mentioned, you have enough points for The Ascent best build to max out 4-5 skills by endgame if you end at level 29-30 and picked up the skill points around the map. I say 4-5, but really I mean 4, most of a 5th and 6 points in Frame to use The Dealbreaker.
You’ll want to level them up in a specific order if you want The Ascent best build.
You’ll absolutely want Vital Signs first to increase your max HP. That’s #1. Dump your first 20 points into that.
Next up is Critical Hit. This is easily the second priority.
For the third stat, I’d say Weapon Handling is the most important. There is some wiggle room here. Some people really like Tactical Sense. Personally, I think double reload speed is way more useful than increased Tactical Charge.
Fourth, I’d say put a few points in Tactical Sense, maybe 9 for double Tactical Charge.
Then move onto Body Battery. Max that out, or put in as many points as you feel the need to.
Then 6 into Balance.
Last, dump your remaining points into Tactical Sense.
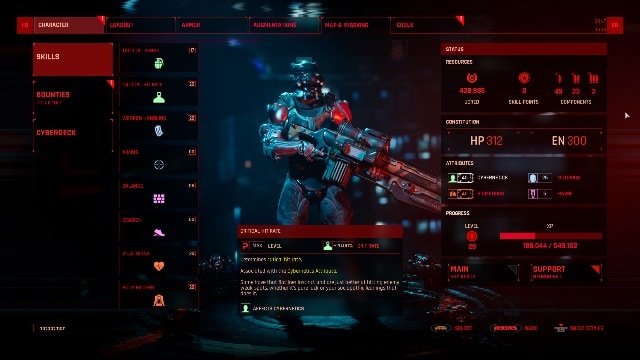
Your stats should look something like this at the end of the game:
Best Weapon – The Ascent Best Build Guide
Everyone touts The Dealbreaker as the best weapon in The Ascent, and that’s technically true, but it’s almost like the Hyper Beam in Super Metroid. You get it for the final boss, when the game is basically over, and that’s about it. In terms of The Ascent best build it’s kind of a bonus weapon.
Meanwhile, there second best gun, Overwhelmer, can be grabbed in The Edge right after the first mission, and you can use it the entire game. Once you get sent to The Grinder early on, just head a little north of the fast travel station there to The Edge.
The enemies are level 25 or so, but you can just run past them to the Northwest part of the area where Overwhelmer sits in the back of a truck. Pick it up, get out of there either by running away or dying, and you’re all set on guns for the entire game.
Best Augmentations – The Ascent Best Build Guide
As far as Augmentations go for The Ascent best build, there’s a little more personal preference involved here, but I’ll tell you my vote for the best augmentations.
- I/O Converter
This is basically a buff that makes your weapon do a ton more damage to robots. Your other option is switching to an energy weapon (the best one is probably the EBR Enforcer assault rifle), but those are so much weaker than Overwhelmer and The Dealbreaker, you’re way better off rocking I/O Converter anywhere you might encounter a robot) - Overclock
Overclock increases energy regeneration, tactical recharge speed and reload speed and also gives you passive health regeneration. It’s just generally speaking a huge boost to everything. The most useful thing is the health regen, as this and Rejuv Field (Tactical) are the only on-demand forms of healing you have access to. - Joyrun Dragon
Joyrun Dragon works like a chain lightning and stuns pretty much everything on screen. It can come in handy. You pick it up in the back room of the Casino on the High Street tier. - Neutron Beam
Neutron Beam roots you in place while you unleash a beam that does a lot of damage over time. It’s probably the highest damage augment in the game, but its damage output doesn’t beat just shooting The Dealbreaker and it doesn’t provide much utility so it’s mostly just for fun. - Spiderbots
The usefulness of Spiderbots falls off towards the endgame but for a huge portion of the midgame it’s probably the best Augmentation around. It spawns a ton of little exploding Spiderbots around you that both deal damage and draw some of the attention away from you, acting as little robotic meat shields.
That about does it for the Definitive The Ascent Best Build Guide. Be sure to check out the Main Page for the full list of games. Feel free to follow me on YouTube if you’re interested in game reviews or music reaction videos.